One Dozen Essential Elements of a Great Dental Office Design
One of the most valuable and lasting improvements that any dentist can contribute to a successful practice is an investment in great office design. Whether remodeling an existing office or creating a brand new facility from scratch, there are several essential elements to focus on in designing an office that will help create a more productive, comfortable, quiet and user-friendly practice. There are many distinct styles of practice. Clearly, dental office design is an individual matter based on one's needs and budget. Nevertheless, the following key issues are common to any office: esthetics; the empowerment of key personnel; controlling noise; and creating rapid access to key equipment and materials. The next two articles contain the 12 elements essential to your success. They will provide you with what you need to know- from creating a sense of excitement to the effortless integration of high tech equipment into your practice.
1 Right size your practice
The new office should be large enough to comfortably accommodate the needs of your personnel and patients. This statement seems quite obvious, however, we are continuously asked to consult on new (sometimes completed) office designs that, upon evaluation of the practice and its future, reveal plans that are significantly under or oversized. A careful assessment of the practice numbers including a procedure analysis will provide a good indicator of the appropriate targets. The goal is to create a patient flow that allows high efficiency while preventing systems bottlenecks.
2 Your office and your life
We all know that providing dental care can be stressful. You and your staff need a place to unwind and socialize. Leave room for a little fun. Ideally, this area should be as far removed from the clinical space as possible. Conversely, to stay abreast of those essential activities that pay the bills, consider locating your private office close to the clinical area. A conveniently located private office can help you keep your pulse on the comings and goings of your practice and allow clinical staff ready access to your services. Don't hide the real office manager -you- from the practice. (See Figure 1.)

FIGURE 1 : Example of a compact office with high productivity, ADA compliance and ease of construction.
3 Hub and spoke
Sterilization and resupply are the clinical hub of your production terminal. Think Federal Express! Make sure this area is central and fully equipped to both sterilize and restock the entire facility. If you are creating a facility with fewer than ten treatment areas, don't even consider multiple sterilization locations- centralize. Also, don't waste money on a pre-made so-called "sterilization center." They are too compact for most offices and do not provide a good cost-to-benefit ratio. The design details of your sterilization area are crucial. Frequently doctors are sold sterilizing equipment that is faster and therefore supposedly more efficient. The concept of rate limiting steps has rarely been studied in dentistry. Simply stated, an entire process will flow no more quickly than its slowest step will allow. In the busy office, properly staffed for efficiency, the rate-limiting step in sterilization is how often a clinical staff member is able to move the sterilization technology cycle along, not how fast each individual piece of equipment is. Therefore, the fastest equipment is rarely quicker in achieving its actual objective of returning instruments back to treatment than is a well-organized high flow stericenter. While we are certainly not advocates of slow equipment, proper layout, ease of use and durability should be the key to purchasing decisions here. (See Figure 2.)

4 Inventory is easy
Centralize all of your storage not just your bulk purchases. Consolidate your active storage for rapid room resupply as well. Far too many offices that we visit are burdened with tens of thousands of dollars of supplies scattered throughout the office-making control of purchasing and rotation of stock impossible, thus inhibiting the adoption of new generations of products and allowing product outdates to occur. Your resupply system should be hidden from patient view yet immediately accessible to clinical staff for both rapid access and ease of just-in-time inventory control. Products should not be hidden to the staff. Products should not be allowed to remain in their bulky promotional containers and should not, when possible, be stacked vertically. (See Figure 3.)

5 Lab links
Although every practitioner knows that the dental lab feeds resupply directly, too many designs completely isolate these closely integrated areas. The office design should facilitate a quick and convenient transfer between these locations, yet they must be physically separate if even a minor amount of model work (trimming etc.) is performed in office. Labs need doors. Sterilization and resupply must be open to the clinical space. Make sure that the steady stream of items flowing between these areas is unobstructed. Separate, yet united. (See Figure 4.)

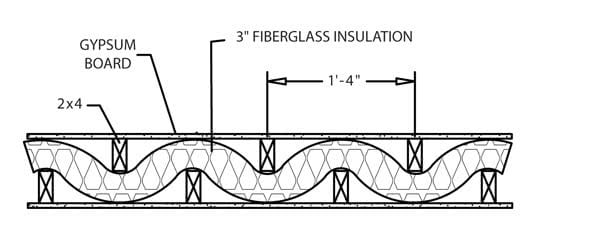
6 Silence is golden
The importance of creating effective sound barriers and sound cushions within the dental office cannot be overstated. In the past, it was acceptable to isolate a waiting room from the rest of the office. This is no longer appropriate as patients expect to be treated as guests and not as inventory or as part of the furniture! Accordingly, superlative sound isolation is imperative in order to provide a quiet atmosphere in what has become the combined front office/guest seating area. Patients hate the sound of dental drills (even more than we can imagine!). Fortunately, many acoustical techniques are available to assist with this problem. However, these soundproofing details need to be carefully evaluated given the reflectivity of high-pitched, air-rotor turbine sounds. Remember, acoustical planning involves not only physical barriers, it also includes the wall compositions, strategic door and window angulations, and, occasionally, state-of-the-art ceiling and wall coverings. Much needed sound attenuation coefficients can be obtained through a variety of different wall and floor design modifications. (See Fig 5.)
7 Written goals are essential
Now that the conceptual foundation for a great dental office has been established, clearly define the professional and economic objectives that you desire in the new construction or renovation - and put your thoughts in writing.
What are you hoping to achieve?
- Expand simultaneous room capacity?
- Attract a more affluent clientele?
- Greater ease of practice?
- Accommodate a new associate?
- Integrate high technology?
Each of these objectives must have clearly defined solutions prior to commencing the actual design process. Make sure you are confident that your design team understands this and can act upon the ramifications of these decisions.
Ready to take the next step?
8 Control costs
Have you ever heard of a construction project where the final price was less than the contractor's initial estimate? I didn't think so! Whether it's new construction or remodeling, once you have committed to your objectives in writing, prioritize them into must-haves, really-wants, and hope-fors. In the enthusiasm of creating a new future for your practice, don't lose sight of the written goals. Although an office should be a comfortable place to enjoy one's work, it ultimately must serve as a profit center. The military estimates that as much as 60 percent of a structure's cost results from long-term maintenance - not the original construction costs. That's amazing! Your plan must include ease of maintenance. An office is not a monument, art project, or the world's greatest real estate investment. The building of any new office should be grounded on a sound dental business opportunity. With appropriate planning, it can be.
9 Create compact treatment rooms
Save money in the purchase of your core equipment so that you'll be able to spend your dollars on the high-technology products that you need - and patients want - for the future. Relentlessly pursue the consolidation of treatment rooms. Efficient room organization and three-dimensional planning for true ergonomic function allows comfortable, efficient, and attractive treatment room pairs in as little as 16 feet of width including wall space. Consolidated spacing leads to a proportional decrease in plumbing and electrical costs per room. With efficient treatment room layouts, sterilization becomes truly centralized and hygienists are not wandering the corridors in search of a doctor. Often, these space and cost savings are great enough to fit in and fully pay for an additional treatment room.

FIGURE 6: No matter what your delivery system preference, compact and efficient room layout markedly improves performance.
10 Embed
While patients are impressed by care, concern, privacy, and yes, even technology, their emotional support for the practice can be easily eroded by cluttered, cabinet-filled, claustrophobic treatment areas that offer little privacy. Ultimately, this is where patients either become comfortable in your care or not. Design your office for simple and inexpensive equipping. Embed core technology within your equipment, don't purchase equipment that forces you to "patch on" the tools that you use every day.
Additionally, it does not make economic sense to save a small amount of money on design and construction that results in the need to lease or purchase expensive cabinet room dividers and head walls. Even if you rent your office space, the tax savings gained by leasing a thousand-dollar cabinet will never exceed the economy and privacy of simple and inexpensive solid-wall room dividers which, in addition to their economy, are far more easily maintained by the reapplication of paint or wallpaper as your years of practice progress.

FIGURE 7: Embed all of your core technology directly into your chosen delivery system.
11 Integrate break down barriers
Don't hide your reception staff from the guest area. Does Nordstrom's hide the best sales people from the shoppers? Similarly, don't isolate dental hygiene from the rest of the clinical program. An isolated employee is a disenfranchised practitioner. Mix hygiene and doctor treatment rooms freely but separate your rooms with solid walls. Oftentimes, the privacy improvements from solid wall use and the increase in space efficiency resulting from reorganization in and of themselves will make your office renovation worthwhile. (Figure 8.)

FIGURE 8: Paired doctor and hygiene rooms in only 16' of width.
12 Mobilize the highest technology
Contrary to the current boasting about building today's highest technology directly into the treatment environment, a simpler and more cost-effective alternative exists which is far more productive in the long run. It is a solution that you may have unsuccessfully tried before, but, if done properly, can be very successful. After you have embedded your basic high technology such as curing lights and computers, put your single-unit specialty equipment such as air abrasion, electrosurgery, and high-tech endo on wheels, not walls. Later, when today's expensive technology becomes more affordable, embed these specialty products directly into your delivery system. A classic example of this is the transition of light curing units. A decade ago, these were shuttled from operatory to operatory. Now, that the technology and price have stabilized, they have become an integrated part of the modern armamentarium. The same will become true for cameras and air-abrasion units, freeing up your mobile units for the next cutting-edge technology. (Figure 9.)

FIGURE 9: A typical Rapidcart® parking lot in a multi-user group practice, showing imaging, operative, endo, and perio units.
13 You've got to have "WOW!"
Last, but certainly not least, the new office should make a definite statement. New patients in particular are forming immediate and lasting impressions of you as they consider placing an extreme amount of trust in your clinical and aesthetics skills. Your office doesn't have to make a bold or glitzy statement, but an appropriate level of quality must be apparent from the instant patients reach your door. (Figure 10.)

FIGURE 10: It's not expensive to create a patient area that communicates a sense of quality care.
Your office design sits at the crossroads of practice productivity and customer satisfaction. It communicates your commitment to patients and is the launch platform for profit. The efforts you make in the planning stages of your new office will bring great rewards in the finished product.
The preceding is a reprint of an article titled, "One Dozen Essential Elements of a Great Dental Office Design" by Dr. David J. Ahearn. The contents of this article are Copyright © Dr. David J. Ahearn. All rights reserved.
The sooner you start the process, the faster your dream becomes a reality.
Call us today1-800-275-2547